Wednesday, November 14, 2012

How To Repair Car Paint Scratch

How To Repair Car Paint Scratch 

Fix It! How to Repair Automotive Dents, Scratches, Tears and Stains (Motorbooks Workshop)Starting from a single thin line to a big rough scratch, it makes your car dull. It mayn’t be visible to naked eye but truth is you know where the flaw is. Ways are many but choice has to be made keeping budget, time & quality into account. Who knows when & how the scratches come, we all try to get rid of it as easily & quickly as possible.
Ways of getting a scratch fixed:-
1.Conventional way 2.Spray painting 3.Touch-up paint
The best way is to go for the conventional method as the professionals do it in a delicate way so that the scratch gets fixed & there is no risk of rust formation on the metal surface. Spray paint will be costlier & may take time as they nearly have to paint the entire panel where the scratch is being made. Easiest way is to go for touch-up paint as the chemical present there is so smooth & easy to use as if there was no scratch at all. Yes, it is costlier than the previous ones & the most important part is that these touch-up paints can’t be used for large patches of scratches.
Conventional way:- It includes sanding & buffing. Normally it is done in the paint shops & garages. Provides a few bucks more as for the labour charges car paint but apparently is better than the other options. The exact match colour paint is to be used here in order to maintain the scratch. Tough isn’t it? You do have to find the original match.
Spray Painting:- Bigger section is to be done in this method as normal way of colouring & polishing won’t work effectively. Time consuming & professional hands are required in this work. Both the conventional & the spray paint works are suggested to be done under supervised condition if trying at home.
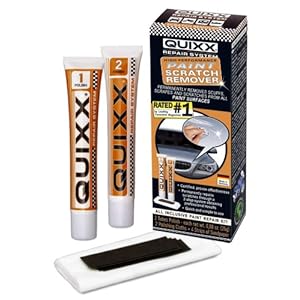
Touch-up paint:- To do so you have to use a soft cloth piece (preferably microfiber or terry cloth) to wipe off the dirt & cleaning & polishing the surface, a good quality touch-up paint spray or a pen if applying it to a smaller section. This is usually practised at home as it is user-friendly, cost attractive & easy to use.
It is advisory to go for the professional way of fixing the paint work or if practising it at home then be sure to use the genuine & good quality polishing material & the paint you are going to buy.
About the Author
Buy automotive touch up / auto paint online in spray cans, Clear Coat Scratch Repair , Auto Paint pens or touch up bottles.
Use and distribution of this article is subject to our Publisher Guidelines
whereby the original author’s information and copyright must be included.
Ameli Jones
RSS Feed
Report Article
Publish Article
Print Article
Add to Favorites
Article Directory
About
FAQ
Contact Us
Advanced Search
Privacy Statement
Disclaimer
GoArticles.com © 2012, All Rights Reserved.
car paint


Monday, November 12, 2012

How to repair the car Upholstery

«««Browse» home»» how intro to automotive repair 1 examine upholstery. How proceed you is affected by the type of material used for the repair of upholstery. Know if you are dealing with a blend.2 fabric determine the nature of the problem with the upholstery, leather or vinyl. Tears must be treated differently from the holes created by cigarette burns. Know if you are dealing with a hardware rip or burn can hole that you narrow your attention on possible solutions.3 needle thread. Use the wire that is strong enough for use with upholstered products. In addition, the needle should be slightly curved instead of a needle sewing easy and sustainable. You can find tack needles to many fabric shops. In a pinch, you can go with a curved needle canvas purchased from a marina.4 starting to sew the torn area. This is most easily accomplished with a simple "X" stitch An item of this type is a hummocky cross design that creates the appearance of a x. be sure to place stitches tightly, as this will help strengthen the overall grip of the stitching.5, apply a small amount of gel padding over the seam. This step is generally recommended for vinyl and leather only. Use a patch that has grain pattern similar to indent the surface of the gel. This will help create a model that will soften the appearance of the stitches.6 allow the freezing of the value. When you are finished, the rip or tear must be completely sealed, ensuring that the torn area does not continue to expand. The hardened gel will help protect stitches and avoid any stretch that could create a new scam in the immediate vicinity.

View the original article here

Saturday, November 10, 2012

How to repair the car glass

Car glass repair
What we have here is a kind of piece of race car for our customers, we repaired various front, warhead has been more recently documented in the forum. Car fiberglass repair is pretty much the same as anything else, in fiberglass car fiberglass in polyester resin. I go to my manual on how to make sure that everything is done by reference books.
Here is a picture from us, as well as the crack that we repair. This is just a panel of the car, I\'ve never actually seen racing car, before that pieces of it!
repair fiberglass
Car Fiberglass Crack
Let's start by cleaning the part with the cleaner wax and silicone, here is an example of an acceptable product fiberglass:

Once cleaned, it will grind on the slot on both sides on a slope of 30 degrees on both sides. We will then be sanded with paper grain 80 centimeters beyond. Here are our crack after tapering it out and back with 80 sanding (more than one hole now):
Fiberglass Crack
and here is what we will do to repair:Fiberglass Repair
At this point, we cut a few pieces of matte glass in sizes to fit our hole and grind the bevel facing upwards. I\ get two pieces at the back and the other on the side front of the hole.
Car Fiberglass Repair
They must then be saturated resin with fiberglass, usually just called a polyester resin, resin must first be enabled with a hardener liquid and sheaf. It is good to have a brush to spread the resin after too much, here is an example of an acceptable resin for this kind of repair:

Mix up enough for a fabric on the aesthetic side and get a piece of fabric soaked resin, place it over the hole and allow the transfer to the top. Drive through the hole and form a bit of a withdrawal from the saucer, it should attach to your conical wheel and dive into the hole. Mix a bit more resin, soak a cloth over and apply a few pieces of fabric-resin back, brush on a little more kidney and get out in your 80 scratches. Might you need to sand the front of the car fiberglass coin before the next step, you want to mix the right resin and fill your depression with her to level the surface. Once dry, just block sand with some 120-180 and your repair is performed.
Fiberglass Cloth Car Soaked
Fiberglass on Back side Car Repair
Fiberglass Resin on Crack
Car Fiberglass Primed
Fiberglass car parts are found on different models and brands on this race car I sanded down the back since I don\ ' t know the clearance and re he covered with black paint. If nothing is upward behind it, you could leave it as what, just wanted to be sure. From here it is prepared like any other thing, a key note is to avoid cooking glass fibre as it is easily dimpled. I'm not a big fan of parts in fiberglass on a car, but what you can do. Personally, I find the undulating appearance it gives a tad cheap, especially on the parts of very poor quality. In any case, that\ s just my 2 cents...Also don't forget to cover your skin when using glass fiber or it will make you very itchy, also the gel coat is very bad for you if where a mask when sanding.
** Update **.
I decided that since I have fiberglass nose, maybe I should do a cast of it for future repairs. Here is an example of how they come back to me:
Fiberglass Nosecone Smashed up
And I am asked to bring back it:
Nosecone Fixed
(that is the color of all fiberglass parts I have are current paint btw). The problem with setting is a font I have spend a ton of heavy fill fiberglass, with that, I should be able to get a better shape and keep the weight to a minimum. Here are the new conical nose with duct tape along it, paper hanging on the whole thing waxed with car wax:
Car Nosecone
Then I put some clothes on and pour on a resin, it spreads out with a brush.
Fiberglass Cloth over Nosecone
After letting it dry I lift carefully and have a cast to help me with future repairs:
Fiberglass Cast

View the original article here

Thursday, November 8, 2012

How To Repair Car Seats After Damages

How To Repair Car Seats After Damages


Evenflo Tribute Sport Convertible Car Seat, Daisy DoodleThe interior of your auto is subject to wear with frequent use. This means small tears in your upholstery along with stains. A professional auto upholstery company can repair fabric, vinyl and leather seats in most cases, but there are at-home methods available, too.
Fabric
The best time to repair car seats with a tear is while it is small. Large rips are harder to mend neatly and are best dealt with by a pro. For fabric tears, you'll find it's possible to hide the repair if it's near a seam. Use a needle and matching thread and close with small stitches. Keep in mind if the fabric is frayed, the mending will be obvious.
Vinyl
A vinyl tear can be remedied with a matching vinyl patch. Match a vinyl swatch to your upholstery color.  Carefully trim away any rough edges around the hole in the seat, and slip in the patch underneath. Use tweezers if your fingers are too thick to work carefully. Once the patch is in place, gently raise the torn upholstery over it and apply a vinyl adhesive around the edges, then press down. Never adhere a patch on top of a hole as it will not stay for very long. Keep the patched work out of direct sunlight as it dries according to directions.
For a more professional method to repair car seats, you can order an auto repair kit  that comes with a matching compound and textured sheet to cover the surface area. A heating tool is applied, and the paper sheet is peeled off after it cools.


Leather
Leather damage can be refurbished using some of the same methods as vinyl repair. There are also leather restoration kits available for cracks and fading that are mixed to match your upholstery color.
For water damage, leather seats can be massaged until they soften, even if exposure has made them stiff. If the damage is major, no matter what type of upholstery you have, the whole seat cover may have to be replaced because cushions will absorb contaminants and eventually smell.
Photo Credit: Car Junk Yard by MyLifeStory
View the original article here

Wednesday, November 7, 2012

How to Repair Car Bodywork? - How To Spray Paint A Car

How to Repair Car Bodywork? - How To Spray Paint A Car

The Complete Guide to Auto Body Repair (Motorbooks Workshop)There are numerous elements that can cause damage to car and makes difficult keeping its original luster and shine. Foremost, its exposure to the ultraviolet rays can reduce that gloss of your car’s finish. Collision with other cars or any other hard object may also cause scratches that can damage its paint. When cars lose the color and shine it once had, it will never look the same and its value will be lowered. Here are some bodywork repair manual that you can use to maintain the appeal of your car.
In dealing with faded car color or any car scratches, the best thing that you can do is to spray paint the car. There are some tools, supplies, and equipment that you will need to do this simple work. The tools are not really huge expense and you will be able to use them in the long run.
Before spray painting, your car needs to be thoroughly cleaned. For this, you need to have good quality carwash detergent, wax or degreaser. Because of its natural wear and tear, your car may also have rough spots. The latter may also be caused by the development of rust. To smooth it out, you will need varieties of grits of sandpaper. Almost every vehicle will have little pits that may be caused by small flying stone, so, you also need to prepare your putty and putty knife.


For those areas that you don’t want the paint to touch on, you will need paper coverings and masking tapes to keep it in place. The most important tool that you need to have is the paint and the aerosol can or sprays guns. Since there are numerous varieties of paint in the market, your choice would depend largely on what spray tool you are going to use. There are paints specifically to be used only with spray gun or aerosol cans. Since paint is not cheap especially if you want the quality ones, make sure that you have a budget for it.
Another very important bodywork repair manual when you spray paint a car is to observe the necessary precautionary measures. Foremost, you have to remember that you will deal with pains and primers which are flammable and harmful substances. So, before even starting to work on it, read thoroughly the instructions on the label of the product that you will use. This can inform you of the necessary measure you have to undertake. Following them is very critical.
When you are ready to work, wear a mask always. You must have two types of the necessary masks for this type of work. You must have the one used for dusts as when you do sanding and the one for fumes especially if your area is not well ventilated. When you will use caustic products like paint stripper, you may as well wear gloves. This would ensure that you will finish the project without any paint getting in your hands. While some peopled does not appreciate the use of goggle, you should learn to. This safety gear will ensure the safety of your eyesight. Remember, getting any splash of rust or substance in your eyes may cause irreparable injury. Aside from this, also make sure that your working environment is orderly and clean.

Classic Car Bodywork Restoration Manual (4th Edition): The Complete Illustrated Step-by-Step Guide (Haynes Restoration Manuals)Before you start to spray paint a car, it is equally important that you have bodywork repair manual in terms of the techniques that may be used. If what you will be doing is just a touch up, using regular spray paint in cans will be sufficient. To use this, you just have to keep your hand moving while you spray the paint in the desired area. For larger projects, you can use spray guns that combine paint with air to have the needed pressure. The use of high volume low pressure technique should be employed to reduced the over spray and the paint reaches the area being targeted. You may also use electrostatic technique for those areas that are harder to reach.

Once you have identified the technique you are going to use, you have to remember some more bodywork repair manual. You need to ensure that the car that you will be painting on is dust free and dry. To achieve the best result, do not spray paint a car during extreme humidity. The ideal temperature for painting is at around 50-90 F. you should also avoid painting during windy weather, as dusts may settle on the newly and wet painted area. The more important point to keep in mind is that spray painting should be than in thin coats. To this, you need to keep the nozzle of the spray moving. If you will stop your hand from moving, paint will accumulate in just spot which can have terrible result.


Tuesday, November 6, 2012

How to repair the car Easily paint damage

1932494227Most people love their cars, be they new or old. Therefore, when their cars suffer from any defect that causes responses varied from different individuals. Many feel discouraged and long to preserve the original appearance of their vehicle. Subsequently, most people are looking for ways of good markets and easy how to repair car paint damage that will be enough. The presence of abrasions and dips on the body of your car disfigures his appearance. This kind of disability is sometimes inevitable, even with careful driving. These portions of pasture are more prone to rust so completely disfigure the looks of your car. However, to avoid further loss you should service vehicle immediately mutilation occurs without unnecessary delays.
When the damage is larger, you should consider taking your car to an expert mechanic for the revision. However, if the damage is slight, it is possible to repair at home. This requires exact products and in accordance with the correct direction of car paint service to correct the defect of your car to your home at a reduced price.


Before the start of restoration work, it is essential to assess the extent of the injury and the type of work required. The degradation of your car might be caused by the tooth, a scratch or mark. This determines the type of materials to collect for the repair work. It follows that when the purchase of the necessary equipment that you should go for car accessories of good quality for a satisfactory job.
English: A roll of silver, Scotch brand duct tape.
English: A roll of silver, Scotch brand duct tape. (Photo credit: Wikipedia)
First put your car shadow before the start of the work. Then clean your vehicle with SOAP and water to remove dirt accumulated on the surface of the vehicle. Hard spots and marks that remain must be removed by easily using degreaser. This is absolutely essential because it improves the adhesion of the paint when it is applied on the surface of the vehicle.
Review and identify any areas of the bodywork of the car which need repair. The coarse and abrasive areas must be smoothed using the sandpaper. These areas unless smoothed obstruct the smooth finish and that most people admire in most automobiles. Sometimes, this may require filling dents to level the surface followed by additional sanding for good results.
Leave your car to dry before you start your paint job. Use duct tape to cover all sections of the car where paint is not necessary for a satisfactory job. Make sure that the material used does not leak any dye through the holes or gaps on its surface. Then, continue to apply the base layer of the cover on the body parts that require a restore.
It is essential to ensure that the coarse and bumpy areas repaired have thick layers of primer. Then let the cure to improve cohesion between the surface of the car and the coat, making them sustainable. Using a gun to water apply the layer base followed by a second another layer after a considerable time. At the end you use apply a layer transparent at least three times and leave your car dry. As a result, your work of how to repair car paint damage ends. For more information click here


*
Enhanced by Zemanta

Sunday, November 4, 2012

How to fix a car trunk that won't open


*